Table of Contents
Automated Past Due Notification
Using the CATS service and the work scheduler, you can configure CATS to automatically send reminders and notifications to your customers when their invoices are becoming due or are past due.
Creating a Past Due Notification Work Item
To start, go to the Work Scheduler listing under Maintenance > General Maintenance > Work Scheduler.
Select “New Item” in the menu and then choose the “PASTDUE” option from the list of work item types. Or, pick Edit Item to change an existing past due notices item.
This will create a new work item for your past due notification.
Notification Triggers
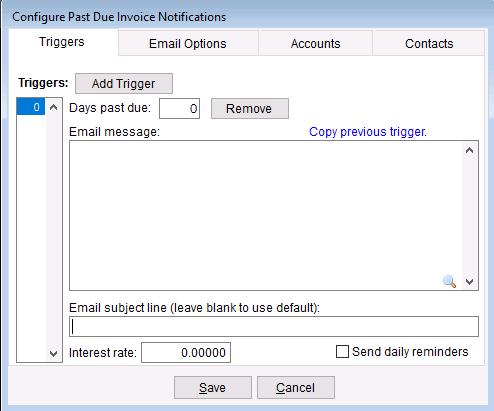
The first time you create a past due work item, you'll be prompted to set up an initial trigger threshold. Enter the number of days past the due date for the first trigger.
The “Triggers” tab of the past due dialog contains a list of all the triggers for the current work item. You can move between the triggers by clicking on the numbers in the column on the left-hand side.
- Click on the “Add Triggers” button to create a new trigger.
- You can change the trigger due date threshold by entering the new threshold into the field.
- Click on the “Remove” button to remove the current trigger.
- Click on “Copy previous trigger” to pull the message from the prior trigger.
- Enter the text for the past due notification message.
- Enter the subject line for the past due notification message.
- Enter an interest rate which will display in the invoice list.
Check the box labeled “Send daily reminders” to have the trigger activate every day after the threshold is met. This allows you to send a reminder notification daily, rather than waiting for a specific date.
Configuring the Notification Message
Each trigger configured for the work item has its own message and subject-line. This means you can set up a notification to trigger for 10 days overdue, 15 days overdue, and 45 days overdue, with increasingly urgent language depending on the situation.
The notification message and subject lines have a number of special entries that allow you to display specific information related to the counterparty and invoices affected.
These special entries are surrounded by curly brackets. The entries are listed below.
- {ACCOUNT} - print the account code for the current counterparty.
- {NAME} - print the person's name for the current counterparty.
- {FIRSTNAME} - print the person's first name.
- {COMPANY} - print the company name.
- {DATE} - print today's date.
- {TS} - print today's date and time.
- {DAYS} - print the number of days past due of the triggering invoice.
- {INVOICEDATE} - print the date on the triggering invoice.
- {INVOICEDUE} - print the due date of the triggering invoice.
- {INVOICE} - print the invoice number of the triggering invoice.
- {SALE} - print the sale contract number of the triggering invoice.
- {PURCHASE} - print the purchase contract number of the triggering invoice.
Special entries that refer to multiple invoices take a [MODE] parameter to control which invoices they apply to:
- {INVOICELIST:[MODE]} - print a table listing of invoices.
- {COUNT:[MODE]} - print the number of invoices for this account.
- {PLURAL:[MODE]:[SINGLETON_TEXT]:[PLURAL_TEXT]} - print specific language for singletons vs plurals.
- {ATTACH:[MODE]} - attach PDFs (from the document store) to the email.
[MODE] can be (do not include any brackets):
- TRIGGER - (default) only invoices that exactly match the current trigger.
- ALL - all matching invoices with a balance.
- PASTDUE - only invoices that are past due.
- CURRENT - only invoices that are not past due.
- TODAY - only invoices that are due today.
- TOMORROW - only invoices that are due tomorrow.
- YESTERDAY - only invoices that are due yesterday.
- A number [1-999] - only invoices that will be overdue due within the specified number of days.
Below is an example of a past due notification setup that will send a message with a list of all overdue invoices.
Types of Triggers
The notification service works using configurable triggers based on the number of days past due for invoices.
Account Status Triggers
Account status triggers are triggers that fire only once per counterparty account.
You would use an account status trigger when you want to send an “overdue” notice to a customer which lists all their open invoices with balances. For example, if a customer has three unpaid invoices and one of them crosses a due date threshold, a message will be generated showing all three invoices in a listing.
Invoice Status Triggers
Invoice status triggers are triggers that fire for each invoice individually.
You would use an invoice status trigger to send a reminder notice to a customer when their invoices are about to come due. For example, if a customer has an unpaid invoice that is due to be paid in 5 days, a message will be generated showing that invoice.
Email Options
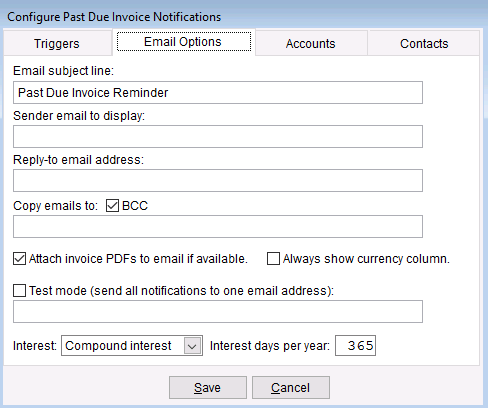
The email options tab lets you modify the header information for the outgoing emails. These settings apply to all triggers listed on the trigger page.
- “Email subject line” the default subject line for all triggers that do not have a subject line set.
- “Sender email to display” the email address information to display to your customer.
- “Reply-to email address” the email address for replies to your outgoing emails.
- “Copy emails to” an email address list to receive copies of outgoing emails.
- “Always show currency columns” check this option to display the currency column even if its empty.
- “Test mode” send emails to a test address (rather than the counterparty).
- “Interest”/“Interest days” used for the interest calculation.
Account Whitelist & Blacklist
The default for new triggers is to include all account codes.
Add Account Codes to the Include or Exclude lists to create custom lists of which account codes to include in your past due auto-generated outputs.
If you Include specific accounts, the module will only scan those accounts. If you Exclude specific accounts, CATS will not scan those accounts for past due invoices.
Working with Past Due Contacts
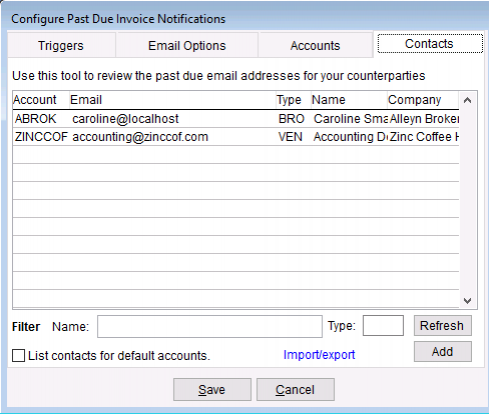
You can create new contacts for use with just the past due invoice scheduler, instead of using the contacts on the account record, which are pulled in automatically on each auto-generated output.
List contacts for default accounts
Check the box next to List contacts for default accounts. to review the contacts that are currently on your account codes.
Add to the List
Click the Add button to add a new contact. A window will pop up asking you to enter which account, Put in an account and click OK to continue.
Search the List
Next to the Filter label, enter a Name (Account code or name) or a Type search for a contact in the list.
Import/Export the List
Click on the Import/export link to call up the options to import or export from a CSV file.
Select a CSV file on your system to be imported, or choose to export the file for manipulation outside the system.
When finished adding or modifying contacts, click the Save or Cancel button to return to the past due notices setup.


