Allocating from a Sale
To allocate from the sale, navigate to the sale contract main screen.

Select Alloc from the menu [1]. If you have multiple sale items on the contract, you will be prompted to select the item from this contract that you wish to allocate.

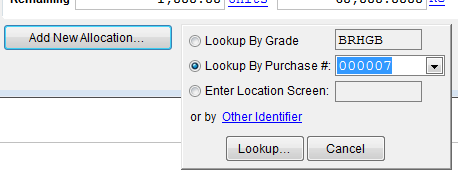
To add an allocation, click on the button labeled “Add new allocation…” Then enter the information to identify or look up the location screen.

You can look up the location screen by grade code, purchase contract number, or location screen number. You can also use a number of other traffic identifiers (including fields on the marks) by clicking on the “Other Identifier” link.

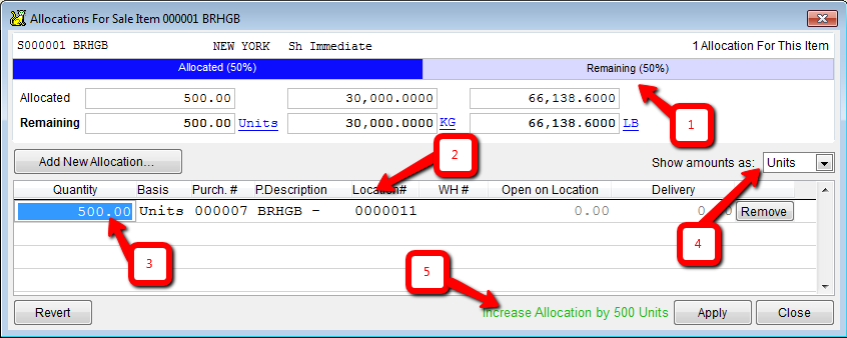
When you select the location screen a new allocation will be created. By default, CATS uses the minimum of the unallocated units on the sale item and the unallocated units on the location screen for the allocation. If no unallocated material exists on either the sale or location screen then the allocation will be created with zero units.
The allocation dialog displays the allocation status of the sale item [1] as well as a list of the location screens it is allocated to [2]. You can modify the allocations by changing the value in the “amount” column [3]. You can also change the displayed basis on each item or on all the items [4].
The overall change in allocation for this sale item is displayed at the bottom of the dialog [5]. Click on the button labeled “Apply” to save the changes. Click on the button labeled “Close” to close the dialog and return to the sale contract main screen.

The sale contract screen updates to display the new allocation information. The item displays a link to the allocated location screen. If you have allocated an item to multiple locations, clicking on the link will bring up a list.