Creating a Delivery from a Sale
To create a new delivery from the sale contract, select Dlvery/New from the menu on the Sale Contract main screen.

Selecting a Location Screen
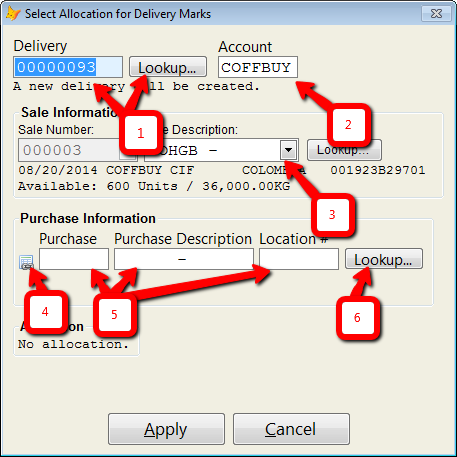
This will bring up the “Allocation” selection dialog.

- [1] To attach this sale to an existing delivery, enter the identifier or choose “Lookup…” to select the appropriate delivery record. Otherwise, a new delivery record will be created using the identifier entered here. (The identifier does not have to be a number).
- [2] Enter the account for the delivery (this will be the account used on the invoice). By default the account is set to the account on the Sale Contract. If you are adding to an existing delivery, the account cannot be changed here.
- [3] Select the sale item from the list. CATS displays some summary information about the selected sale item. The amount “available” is the units and weight not currently committed to delivery or production.
Select the location screen which contains the material you wish to deliver. There are a number of ways to select the location screen.
- [4] Use the list icon [image] to select from a list of location screens allocated to the sale item.
- [5] Enter the contract number, purchase item, or location screen information.
- [6] Click on the “Lookup…” button to select from a list.
Adding an Allocation
An allocation is required in order to create a delivery. If an allocation already exists, the dialog will display the allocation amount and the number of marks available.

If no allocation exists between the sale item and selected location screen, you will need to check the box labeled “Add new allocation” and enter the allocation amount.

Click on “Apply” to close the dialog and continue. This will bring up the marks selection dialog.
Selecting Marks
Select the marks that should be applied to the new delivery.
- [1] The units and weight remaining on the allocation.
- [2] Click on the button labeled
Fulfillto have CATS automatically select the marks. - [3] Alternatively, you can select the marks manually by entering the units or weight to apply on each mark individually.
Fulfill will try to choose the best marks that fit the current allocation. In this case, since the allocation is for 50 units, clicking on Fulfill will select the single mark that has 50 units.
The dialog will keep track of your totals as you modify your selections. The label will change to “Fulfilled” once all the allocated units and weight are selected [1]. It is not necessary to fill the allocation, if needed you can apply just a portion of the allocation and leave the rest for another delivery.
Once the required marks are selected, click on “Continue” to create the delivery record.
Reviewing the Delivery
The delivery screen shows the newly created delivery record with the marks we selected.
Select Exit from the menu (or press ESC) to return to the sale contract main screen.
The sale contract shows the units and weight on delivery [1]. Click on the delivery link [2] on the item to jump to the delivery screen. If the item has multiple deliveries, clicking on this link will show the list.


