This is an old revision of the document!
Setting up an Online Backup
Introduction
This page will demonstrate how to work with the CATS Azure backup tool to backup and recover the CATS database and crucial files. (Microsoft Azure is a cloud storage and computing service.)
The Azure backup tool works in tandem with the CATS Backup utility.
Setup
When you open the program you will see a screen like the one below.
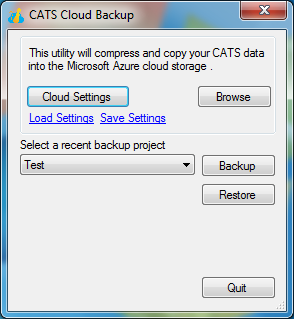
New Data Systems will provide a “Shared Access Key” which grants access to your backup storage. Click on Cloud Settings and enter this key in the provided field. (Once entered, the key will be automatically stored for future use.)
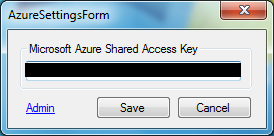
Once the key has been entered, you will be able to access your backup storage.
- Please keep the access key secure as anyone with the key will have access to your backup storage. If you are concerned that your access key has been compromised, New Data Systems can revoke the old key and generate a new key as needed.
Please see the sections below for:
Preparing the Backup Directory
The Azure backup program can backup multiple CATS instances to the same backup storage. To create a new backup directory for an instance, select “Create New…” from the drop down and click on Backup.
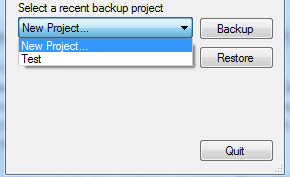
You will be prompted to enter a name for this instance. We recommend using a descriptive name.

The settings for a new instance are shown below.
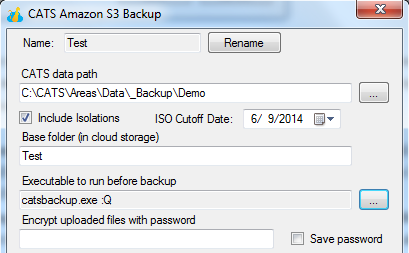
The very first box “Name:” should have the descriptive name you entered for your instance, however it is possible to change it before you have run the backup by pressing the Rename button.
- If you try to rename an older project that you are running an incremental backup on, it will create a new instance instead of overwriting the older project.
Next you will have to create a name for your base folder within azure backup. The base folder is the main repository you create for all of your instances; every time you create a new backup it will be organized under this folder.
- Once you make the base folder you cannot change the name or simply move it around. If you want to make significant changes to your base folder you will have to make a new one from scratch.
The “Executable to run…” box is the directory and path from which your information will be coming from on your computer. Select your hard drive options for these before you begin backing anything up.
Adding a password to your new instance is not mandatory, however if you do not want your files to be accessed than you may want to encrypt it with your own unique password
- If you do add a password make sure to copy it down somewhere, because you will not be able to access the project if you want to change the password or if you lose the password later on in the future.
Backing up CATS Files
Before moving on, it is important to know which backup is right for you
- A full backup is a method of backup where all the files and folders selected for the backup will be backed up.
- An incremental backup is one that provides a backup of files that have changed or are new since the last incremental backup; it is one that backs up only the data that changed since the last backup (whether it was a full or incremental backup).
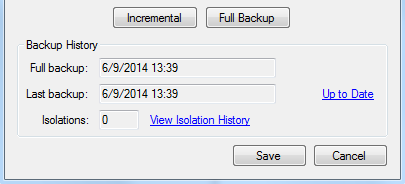
If you are backing up a new project, you will want to select Full Backup on the form above. If you hit Incremental this is also fine.
- Since this is a new project there are no old files that need to be overwritten, so hitting Incremental just means that it will run a regular full backup in this instance.
If you are backing up updated or changed files on an existing project then you should select Incremental. Depending on the size of your project, running incremental backups make more sense as they take far less time to backup the updated files.
- When you have run several incremental backups on the same project, it is advisable to run a full backup to keep all your project files updated.
Under backup history:
- ”Full backup” simply refers to the date and time that day that the last full backup of the project was executed.
- “Last backup” could also refer to the last full backup, however if you have run incremental backups since running the full backup then it will usually refer to your last incremental backup.
- “Isolations” refers to the number of isolations in your project.
Restoring CATS Files
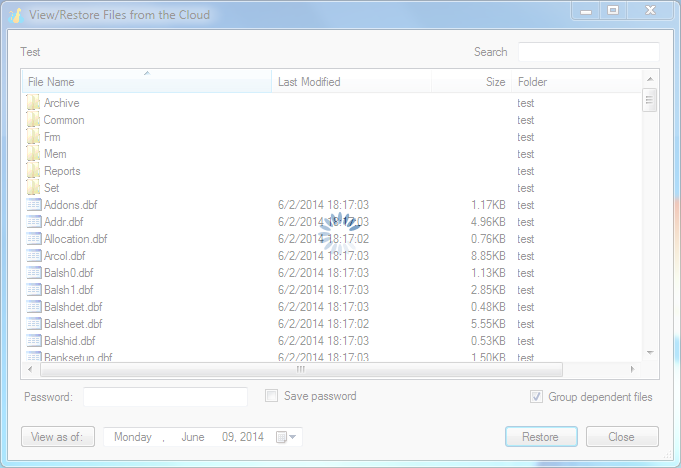
Clicking Restore on the “CATS Cloud Backup” screen as shown in setup brings you to the screen shown below.
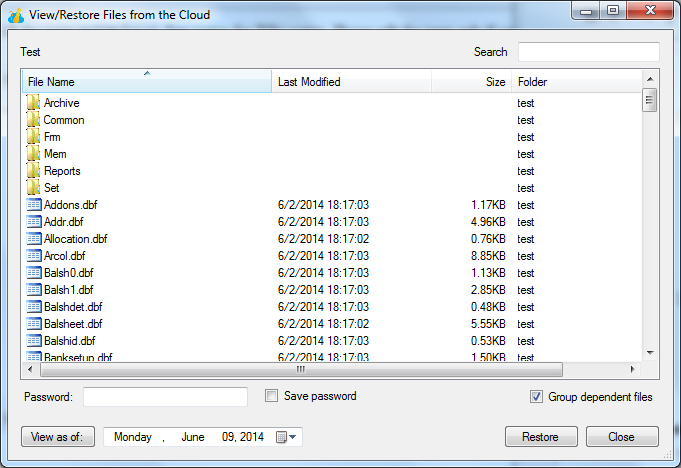
From this screen you can choose to restore:
- an individual file
- a folder
- a group of files/folders
- the entire project
If the backup is encrypted you will have to type in the password into the textbox in order to be able to restore the files.
- Check off the save password box if you want to restore from this project at another time and don’t want to re-enter the password each time. Be aware though that by doing that you may leave it unsecure to anyone who wants to restore without your permission.
Check off the “Group dependent files” box if you have any files within the project that have individual files grouped together in one file type.
- This is something you should always have checked off, since foxpro’s file type (such as tableau) group multiple data and smaller files together into their files within your project.
The View as of: button allows you to go back and restore files from older versions from before your last incremental or full backup. It defaults to restore from your most recent backup, but you can go in and change the date by clicking on the button.
Once you have chosen your restore options, click Restore and the loading screen shown below shall indicate that it is working.
