Table of Contents
Itemized Costings Overview
Itemized costing is a powerful and detailed mechanism for estimating costs for a particular trade and across your entire operation. Tracking each individual cost-type (e.g. freight, insurance, etc.) on the trade allows precise P&L calculations, and also gives greater insight into the accuracy of your trading team's operational assumptions.
Itemized costing is an optional setting as CATS provides a number of different techniques to estimate costs. To enable itemized costing, you'll need to modify the System Settings.
Cost Codes
Each individual costing record on the contract item is tied to a particular cost code. As such, it is important to set up your cost codes so that they capture the level of costing detail that you are interested in. These codes allow the correlation of the trader's estimate of the costs accrued by a trade with the actual charges applied from a vendor's invoice.
For a full discussion of cost codes and how to work with them, see the Cost Codes file.
The entered cost of an individual costing item reflects the estimated (or, if you prefer, accrued) cost of that item. CATS will use this value to calculate an exdock value for the trade. For many different types of costs (e.g. freight charges), the actual charges are not known until much later when you receive the bill from your vendor.
Estimating the costs of bringing material to market is an essential part of evaluating the quality of any trade. Traders need to be using accurate information to make the best decisions. Using itemized costing in CATS allows traders and their managers to review these vital estimates and compare them against the actual costs incurred for each trade, origin, type of material, etc.
Itemized Costings on the Contract Item
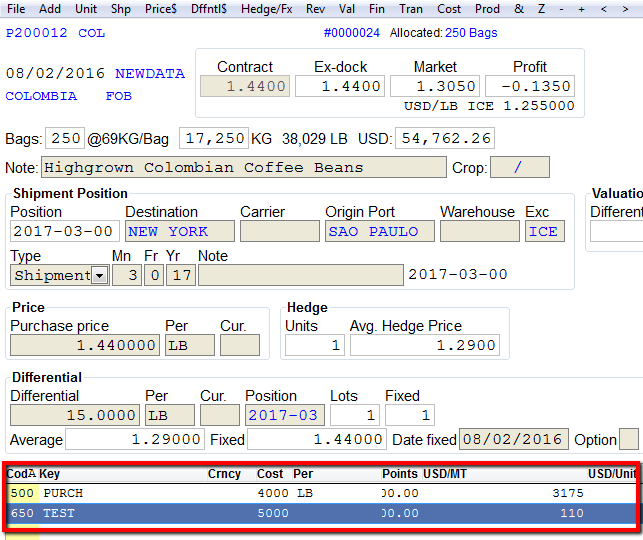
When CATS is configured to use itemized costings, any costings for an item will be display in a chooser grid on the contract item page.
From this list you can quickly see which individual costings that have been entered for this trade, the total cost of those entries, and the total amount charged (on a vendor invoice, see below) against each entry.
The Costings (Tran) Menu
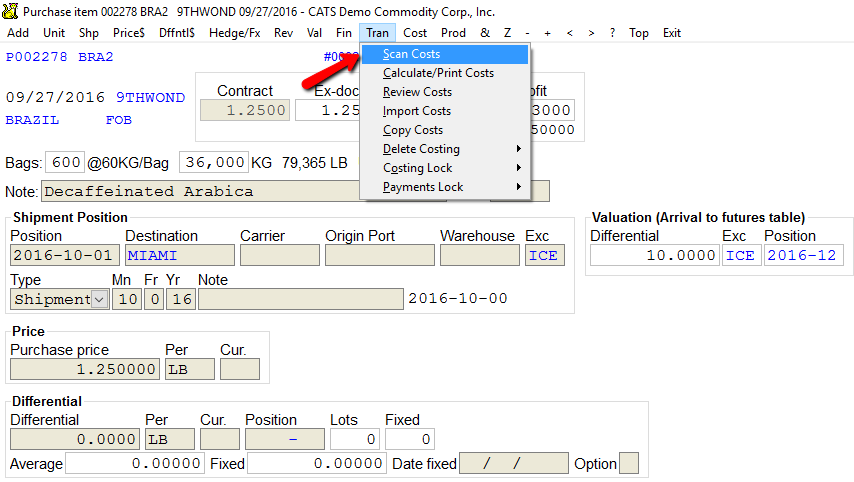
The “Tran” menu on the contract item screen allows you to view/edit and configure the costing entries for the current trade.
- Scan Costs: pull up the costings for this item in a grid format. From this grid you can add, edit and remove entries.
- Calculate/print costs: print a detailed of the costs report and recalculate the costs for this item
- Review costs: view and change the costing “header” record (e.g. for changing interest rate)
- Import costs: automatically add costing items to the current trade from Cost Analysis.
- Delete costing: batch remove costing items from the current trade.
- Costing lock: prevent changes to the costings on the current trade (until unlocked).
- Payments lock: prevent payments against the costings on the current trade (until unlocked).
The Costing Header Record
The costing header record provides a place to specify specific information about a particular Grade, Origin and Destination. This is commonly used to set the transit days and other details from which CATS can calculate the total price of certain costs (e.g. insurance).
Adding Costing Records Using the Cost Analysis
CATS provides an automatic mechanism to add costing items to a trade based on the product, the contract terms, the country, the origin port, and the destination. A contract item with matching the cost analysis details will automatically pull in the itemized costings and header details for that cost analysis as configured.
For a full discussion of how to configure cost analysis records, see Cost Analysis.
Adding Costing Records by Copying a Contract
When adding a contract, there's an option to copy the costing records as well. For contracts that have similar costings this can save a significant amount of data entry.
Reviewing Itemized Costs with Scan Costs
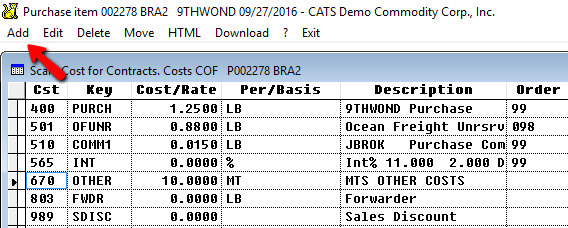
You can view the itemized costs by selecting Tran > Scan Costs from the contract item screen's menu. This will display all the costing items for the current trade in a grid layout.
You can use this grid to quickly review and edit the costs. You can also add or remove costs.
After you make your changes CATS will recalculate the costing totals and offer to apply the new costs to the current trade's exdock calculation.
Adding Itemized Costs Manually
You can add itemized costs to the current trade from the Scan Costs screen. From the menu select Add.
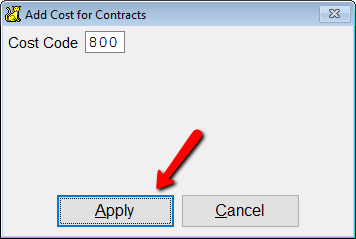
Enter the cost code for the new item, then pick Apply.
Then you can enter the details for the new costing record. Enter the rate and the way the cost will be calculated (per Lb, KG, points, percentage, etc.). Pick Apply to continue.
Here are the fields and a brief description for each field on a cost:
- Name: The display name for this costing item. Defaults to the name of the cost code.
- Key/Special: A short-code for the costing item. Defaults to the short-code of the cost code.
- Order: Display order for setting up a default sort for the items.
- Locked: Prevents changes to this costing item.
- Cost/Rate: Expense rate for the costing item.
- Currency: Currency for the costing item. If blank it uses the system's default currency.
- Per/Basis: The basis for calculating the total expense rate.
- BAG/BOX/UNIT: price per unit on the item
- SHIPMENT: fixed price for the entire contract item.
- LB/KG/MT: price as a factor of the weight.
- POINTS: price as a factor of the number of pounds. E.g. [Rate: 10,000 Per: POINTS] is the same as [Rate:1 Per:LB]
- RATE: a fixed portion of the contract item's price. E.g. [Rate: 0.5 Per: RATE] will be 1/2 the contract price.
- %: a fixed percentage of the contract item's price. E.g. [Rate: 50 Per: %] will be 50% of the contract price.
- Track Payment:
- Allow change during recalc: permit CATS to recalculate the points and total price for this costing item.
- Variable: CATS will recalculate the points and price whenever costing is recalculated
- Fixed: CATS will not recalculate the points and price
- Not Applicable: CATS will not recalculate
- Manual:
Editing Itemized Costs
You can edit an itemized costing record for the current trade in a number of ways.
Double-click on the item on the contract item screen.
Change the values directly on the Scan Costs grid.
Select Edit from the Scan Costs menu.
Recalculating and Printing Itemized Costs
After you have changed all of the costs, you can exit the scan costs area.
Calculate/print progress screen will show.
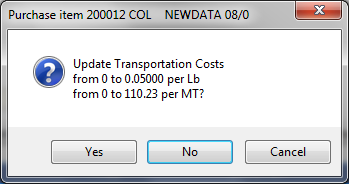
CATS may prompt you to update the transportation costs associated with this item. Press Yes to continue. Transportation costs will be updated.
Invoicing with Itemized Costs
CATS uses a special type of invoice, called a Vendor Invoice, to track the payment of costs.
To create a vendor invoice:
- From the CATS main menu select File > Invoicing > Invoice preparation > Add > Vendor.
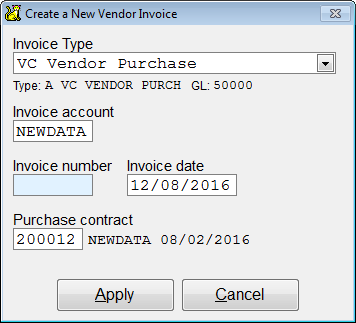
- Select the type of vendor invoice. To pay costs you most likely want the “Vendor Purchase” type.
- Enter the initial details for the new invoice:
- Invoice account: The vendor account the invoice is payable to. (E.g. your carrier)
- Invoice number: The vendor invoice number. For vendor invoices, CATS allows any number so long as its unique to the account. You may use the reference number (or part of the reference number) provided on your vendor's bill, or enter a new number.
- Invoice date: The date of the invoice.
- Purchase contract (optional): If you want to specify that this invoice is for a particular contract, enter the contract number here.
The vendor invoice screen functions just like any other invoice in CATS. The main difference between a vendor invoice and a purchase is that we will be creating the invoice items manually (rather than selecting inventory).
For each costing record we want to add to this payable we need an invoice item.
To create a new invoice item:
- Select Invoice Item > Add Invoice Item from the invoice screen menu.
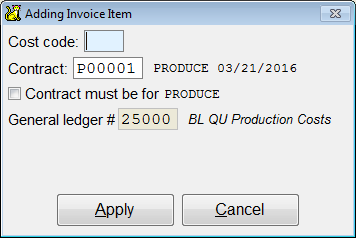
- Enter the initial details for the new invoice item.
- Code code: the cost code for the charge we would like to pay. CATS will use the cost code to apply the charge against the appropriate costing item record.
- Contract: the purchase contract that the charge applies to.
- Contract must be for [ACCOUNT]: check this to require that the contract you pick matches the account on the invoice. Typically, for vendor invoices, this is not the case and you will want to leave this box unchecked.
- General ledger: the GL account that the charge will be booked against. This is filled in from the cost code, by default and depending on your system settings it may not be possible to change the GL number.
- Click on
Applyto create the new item. - Select the appropriate item for this charge from the list. If the contract only has a single item the list will not be presented.
- Enter the details for the charge. CATS presents fields for entering weight and units and a price-per-LB. You can simply enter the total amount. You can also change the description which affects how the printed invoice will appear.
- Click on
Applyto save your changes.
You can continue to enter items as necessary. For example, you may want your invoice to match your vendor's bill.
Once you have all the charges entered, print the invoice and review it to ensure that all the entries are correct. Finally, if the invoice is correct, you can post the invoice (as an option after you print).
Posting the invoice will apply the charges against individual costing entries on each contract item selected for the invoice. If the contract item already has an entry, the charges will be added, if not a new costing entry will be created for that item. On the contract item screen you can see the total amount that has been booked against each costing record.
Additionally, posting the invoice will book the vendor payable into the general ledger.
Reporting Implications
CATS provides reports that allow you to review your inventory and see what costs have been estimated, what costs were paid, and what costs are accrued.

