This is an old revision of the document!
Vendor Orders: Setting up, Managing and Using
Managing costs is an important part of the commodities business. The Vendor Order system in CATS is a distinctive tool to help anticipate costs, cut down on duplicative entry and streamline vendor reconciliations. The Vendor Order system leverages the standard traffic documents (delivery order, shipping instruction, etc.) as the framework for a customizable and extensible costing rubric.
Defining the vendor roles that pertain to specific traffic documents, allows CATS to automatically generate the vendor charges when those traffic documents are created. Additionally, vendor order templates can be set up to mirror individual vendor's price lists.
In this wiki, you can learn:
- How to set up and configure vendor roles and vendor order templates.
- How to generate vendor orders automatically using traffic forms.
- How to add and modify vendor orders on a traffic form.
- How to generate payable invoices using vendor orders.
About Vendor Orders
Vendor orders represent itemized charges that could, for example, be entered on a vendor invoice. Vendor orders are generated in the process of creating traffic forms (also called traffic orders, e.g., DO, SI). Vendor orders for multiple different vendors may be generated from a single traffic form.
Each line item on a vendor order is the charge you expect your vendors to send you after performing a specific action on your inventory (loading, shrinkwrapping, customs fees, etc.).
First, you will set up pre-defined vendor roles, which specify the type of charges that relate to each traffic document type.
Further, you can set up templates for each role. CATS will use these templates to automatically calculate the amount due to each vendor based on a specific traffic form.
When you create a new traffic form, CATS will pull in all of the vendor order line items that it finds that relate to the roles and templates you have set up.
Enabling/Disabling Vendor Orders
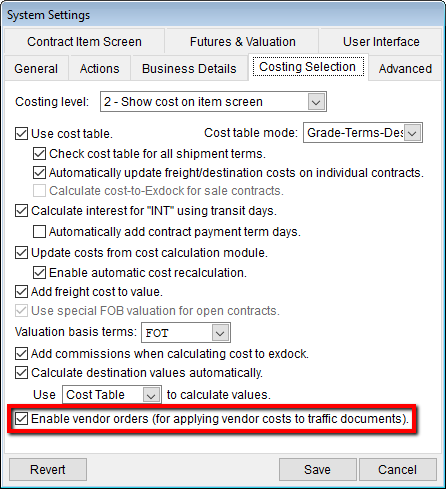
Go to File > Maintenance > Setup > System Setup. Click on the Costing Selection tab and check the box Enabled vendor orders (for applying vendor costs to traffic documents). This will enable the vendor order feature. You can disable the feature by un-checking the box. Press Save to continue.
Quick Guide Steps to Manage Vendor Roles
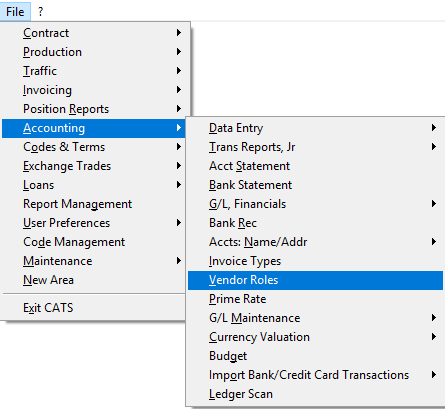
- From the main menu, go to Accounting > Vendor Roles.
- Select Add from the menu.
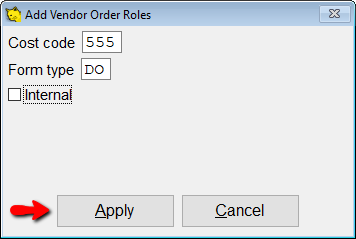
- Enter a Cost Code and a Form Type. Check the box, next to Internal if this is an internal form.
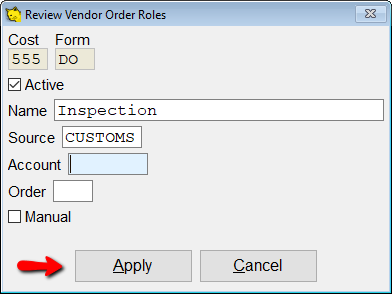
- Enter Name, Source and Account. Press Apply to continue.
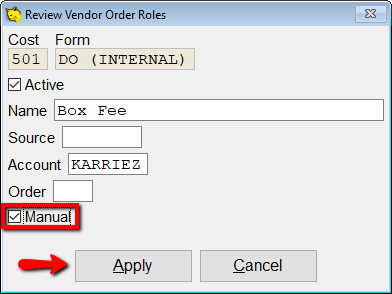
- Make a role manual by checking the box next to Manual. Manual vendor roles will not pull in automatically to any VO. Instead, you will need to add them each time to the VO you want them to appear on.
- Press Apply to continue.
- Click Exit to return to the main menu
Manage Vendor Roles
Vendor Roles define cost types that apply to specific types of traffic forms and counter-party accounts. Vendor Roles are created in the Accounting > Vendor Roles.
Add a Vendor Role
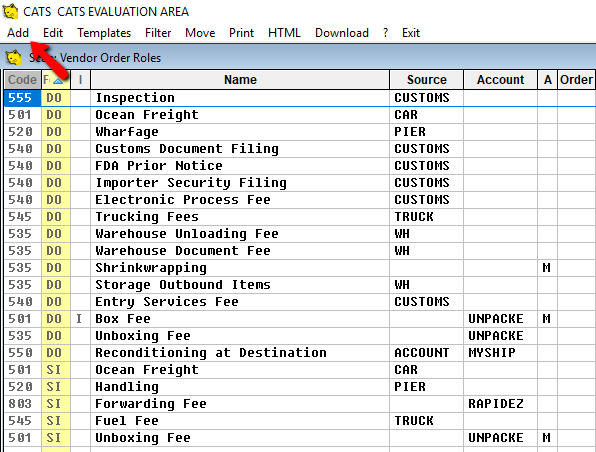
To add a role, choose Add on the menu bar.
Enter a Cost Code and a Form Type. Check the box, next to Internal if this is an internal form. Press Apply to continue.
Next, enter Name, Source and Account. Press Apply to continue.
By default, Vendor Roles listed or added here will populate to the matching traffic form type automatically.
Column Explanations
- Code - Cost code.
- Form - Traffic form code (DO, SI, SO, etc.).
- I - This column would be blank unless this role is for an internal traffic form, then it would display
I. - Name - Vendor role name, assigned by you.
- Source - The code that CATS will look at to match to a counterparty account. These can be:
BUYER - The Buyer code (sale contract account code).
SELLER - The Seller code (purchase contract account code).
CARRIER - The Carrier code on the item or location screen.
CUSTOM - The Customs Broker on the location screen.
PIER - The Pier code on the location screen (which has an account code in the table).
TRUCK - The Truck code on the order.
WH - The Warehouse code on the location screen.
- Account - Account associated with this vendor role. This must be a counterparty code in the Accts: Name/Address file.
- A - The default for this column is Active which would be blank. N is not active. M means the vendor role will be pulled onto the vendor order but it will need to be added manually.
Manual Vendor Roles
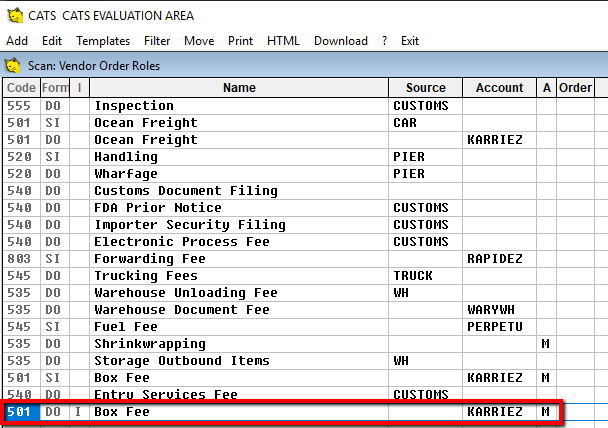
If you add from the vendor order itself, that role would be considered manual. Manual vendor roles will not pull in automatically to any VO. Instead, you will need to add them each time to the VO you want them to appear on. You can make a role manual by checking the box next to Manual while Editing a role.
Click Exit to return to the main menu or the homepage.
Quick Guide Steps to Vendor Order Templates
- Go to Accounting > Vendor Roles to add an order template.
- Go to Template on top menu and choose the role.
- The role, cost and form will already be filled in based on the vendor role you selected. You must fill in vendor and rate to complete the template.
- Press Save to continue.
Vendor Order Templates
Vendor Order Templates tie Vendor Roles to specific counterparty accounts with fixed rates. Use Vendor Templates to define a negotiated rate with a vendor. When a traffic form (such as a DO or SI) is created, CATS will pull information from the templates that match the roles that apply to that specific form.
Go to Accounting > Vendor Roles to view, add, and edit templates.
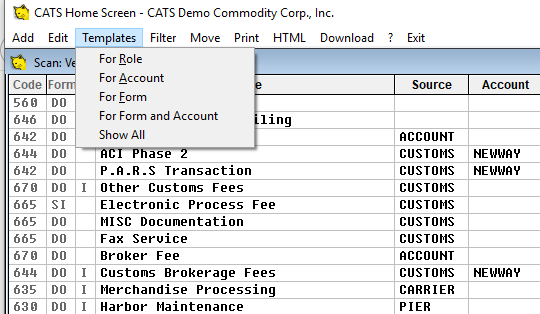
Here you can add, edit, or remove templates. To add or review a template, highlight a role in the scan, then go to Templates and choose a way to look up a template.
- For Role - Manage templates for the currently highlighted vendor role.
- For Account - Enter an account code to view templates for that account code.
- For Form - Enter a traffic form type to view templates for that traffic form type.
- For Form and Account - Enter both a traffic form type and an account to view templates for these criteria.
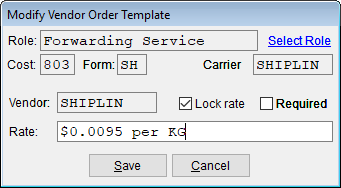
The Role, Cost and Form will already be filled in based on the vendor role you selected. You must fill in Vendor and Rate to complete the template.
Press Save to continue.
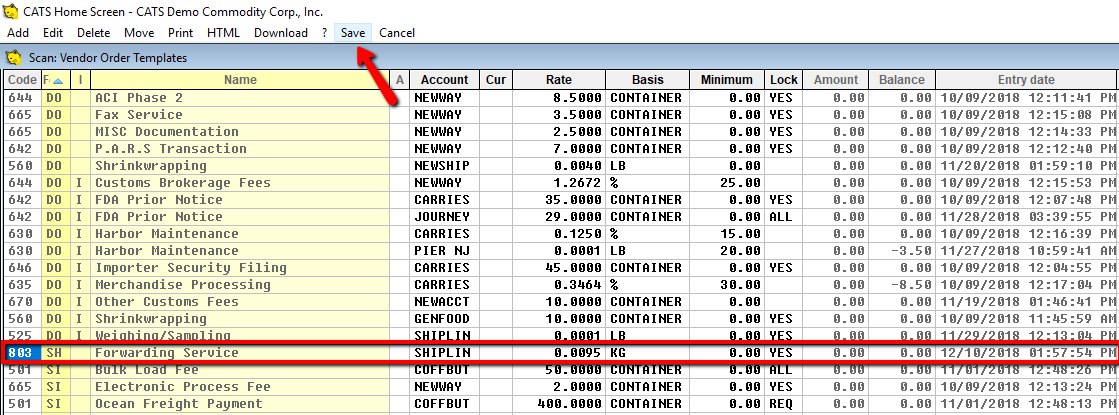
The vendor template scan will now show the template that was added. Press Save on the top menu bar to continue.
You can also change certain values directly from this scan without using the Edit menu option. You can change the Account, Currency, Rate, Basis, Minimum, and Lock status. Once you have changed items in the scan, be sure to pick Save from the top menu to save changes, or select Cancel to revert back to the original values.
Template Options
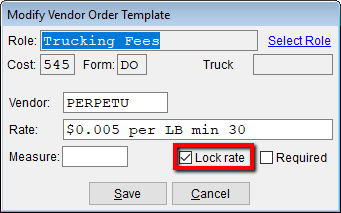
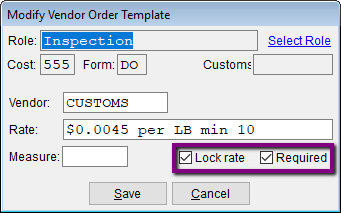
- If you lock the rate on a template, users will not be able to change the rate for vendor order line items added automatically by CATS. To lock the rate, click the box next to Lock Rate. You may unlock the rate at any time by un-checking this box. The Lock column in the vendor templates scan will show
YESfor a locked rate item. (Red box in image)
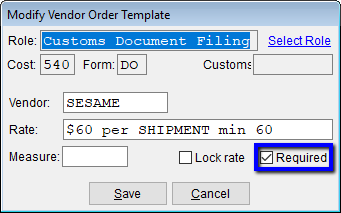
- Templates can also be marked Required. Required templates do not allow you to remove them from the list of vendor order line items on traffic forms. The Lock column in the vendor templates scan will show
REQfor a required item. (Blue box in image)
- If a template is both Locked and Required, the Lock column in the vendor templates scan will show
ALLfor that template. (Purple box in image)
Quick Guide Steps to Add VO to traffic form
- Open the traffic form you will be using.
- Select VO to see the orders to be applied to the form. CATS will show you a list of the vendor orders that apply to this particular traffic form.
- Add/review vendor orders for this traffic form by entering the accounts and rates.
- Use the checkboxes to include/exclude vendor orders.
- Pick Save to save your changes and return to the traffic form.
Add Vendor Orders on Traffic Forms
When a new Traffic Form is created, CATS will pull from the vendor roles for that traffic form to determine what Vendor Orders need to be created. CATS will attempt to pull counterparty information automatically based on the source and/or account in the vendor templates file.
To see the vendor orders for a traffic form, first open the traffic form you will be using or add a new form. Go to Ord on the top menu bar. Use the menu options to Add, Review or Find (search) a form.
For more information on adding and reviewing forms, see the wiki on Traffic forms.
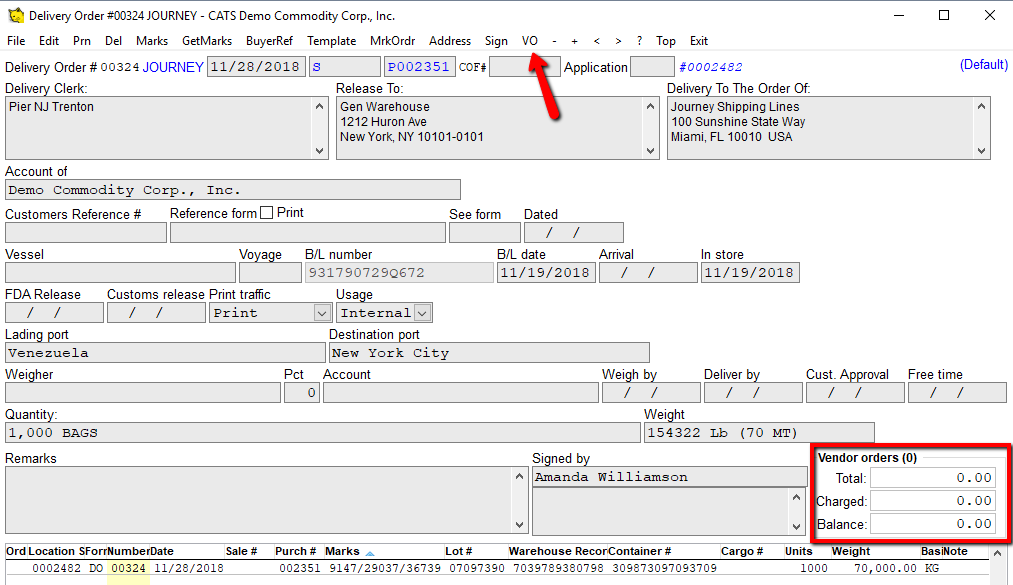
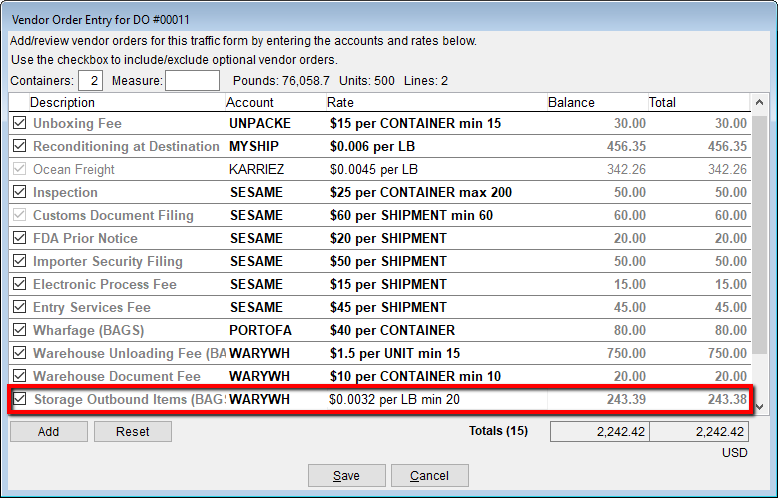
From the form's review screen, select the menu option VO to see the vendor orders that will be applied to this traffic form.
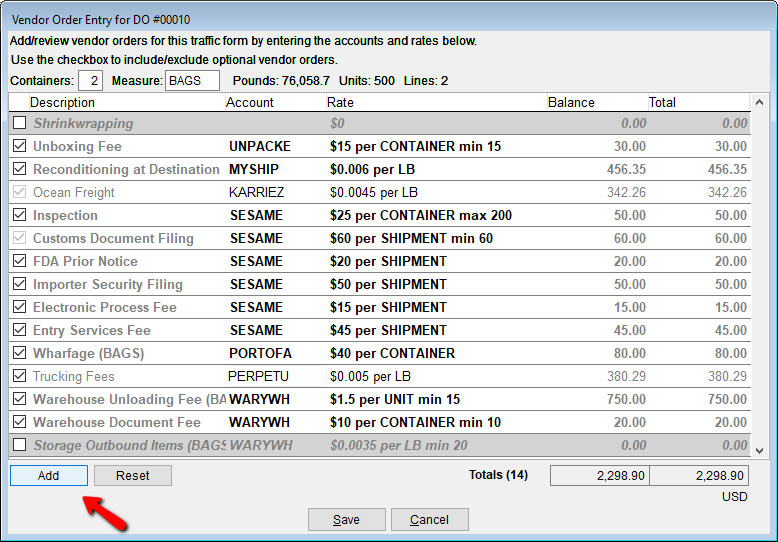
CATS will show you a list of the vendor orders that apply to this particular traffic form.
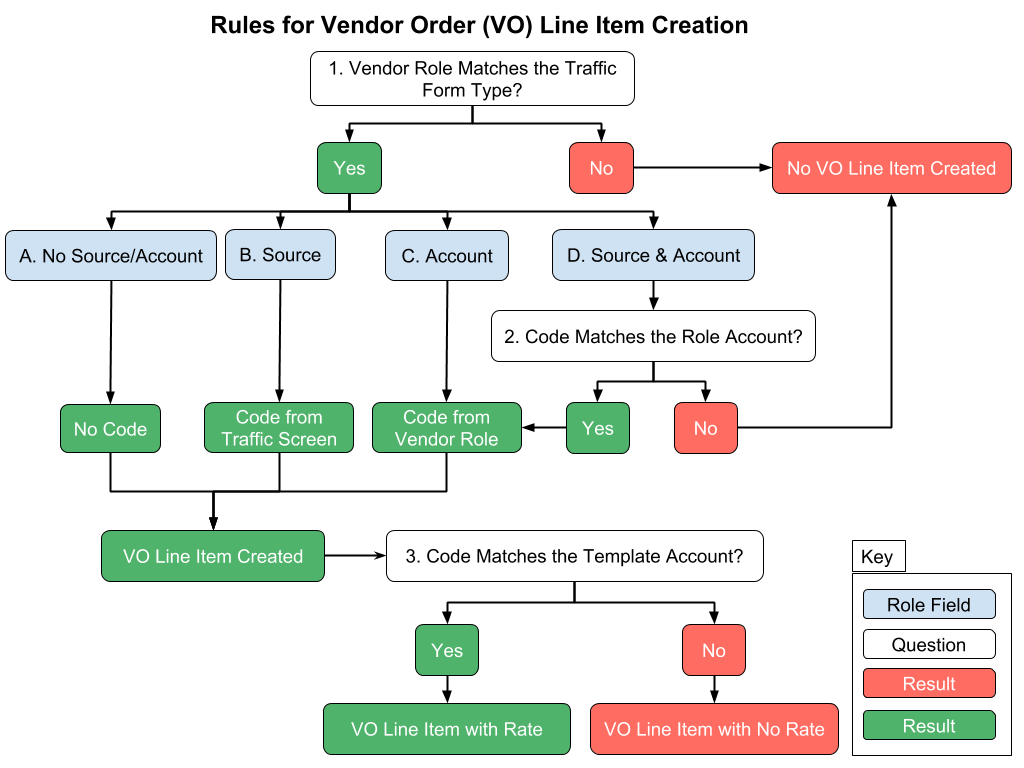
The steps for determining Vendor Order Line Item creation are:
- Match the role traffic form type to this traffic form (Is it a DO? SH? etc.).
- Match the source counterparty code to the counterparty code on the role.
- Match the source counterparty code to the templates file.
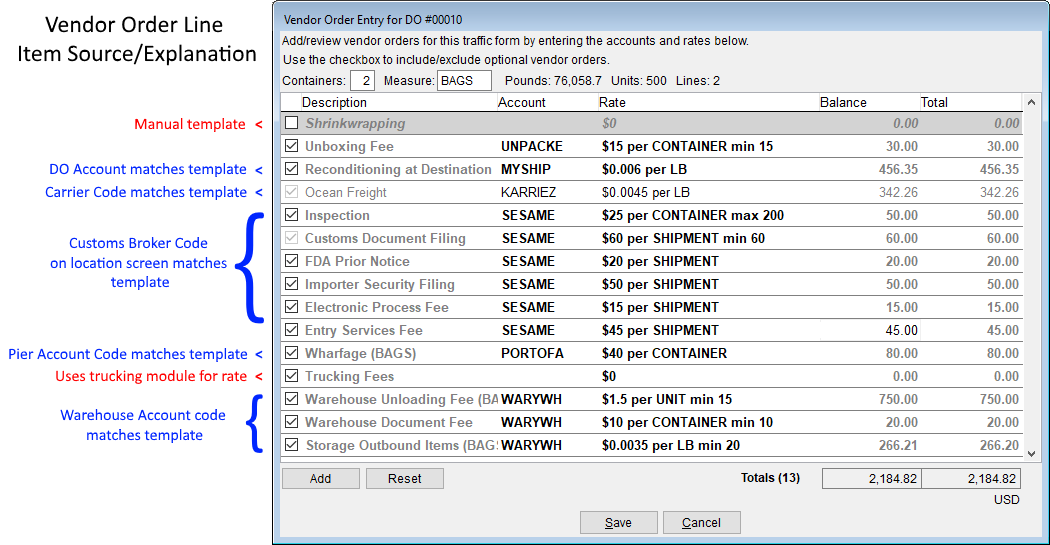
Here is the flowchart for applying vendor roles and templates to create vendor order line items on traffic forms.
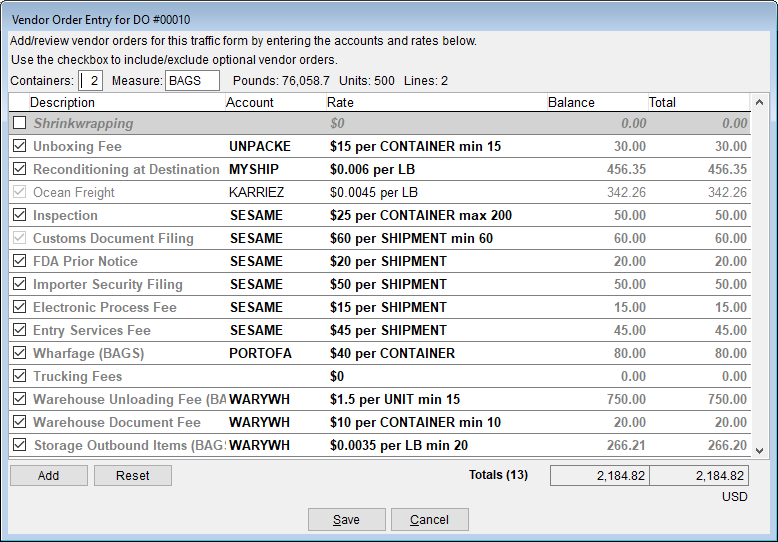
Here is how CATS applied all of the vendor roles and templates to create the vendor order line items on this particular DO.
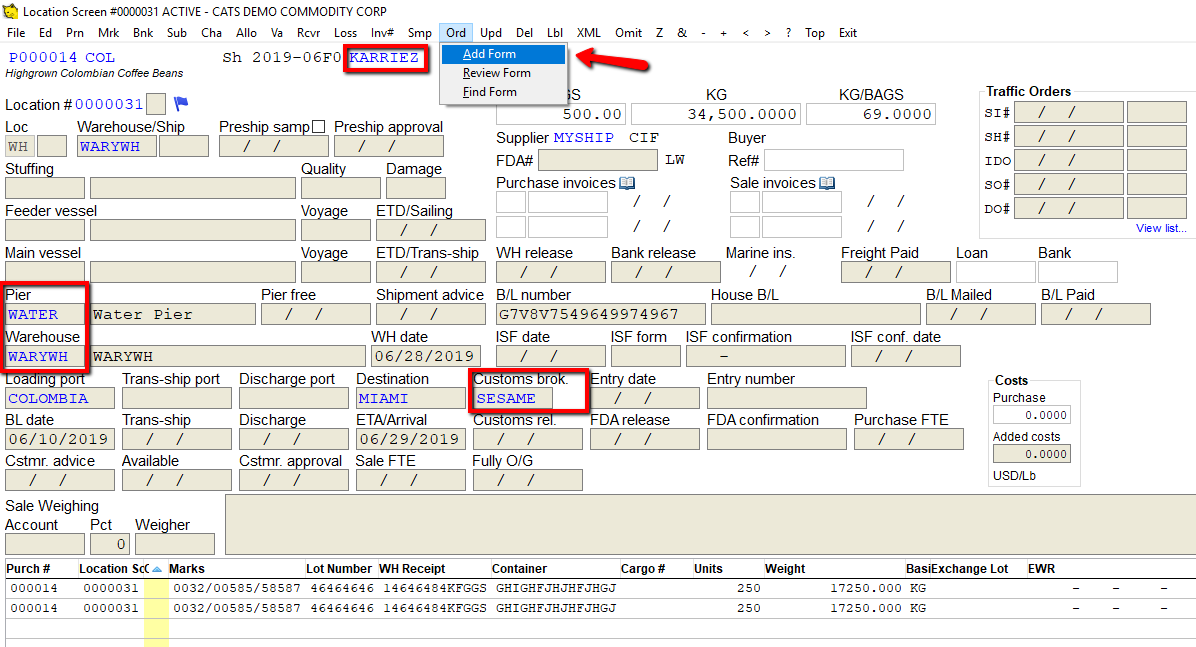
On the location screen we have used to create a DO, we see the following:
- Warehouse Code:
WARYWH - Pier Code:
WATER - Carrier Code:
KARRIEZ - Customs Broker:
SESAME
We also see above that our DO is for account MYSHIP.
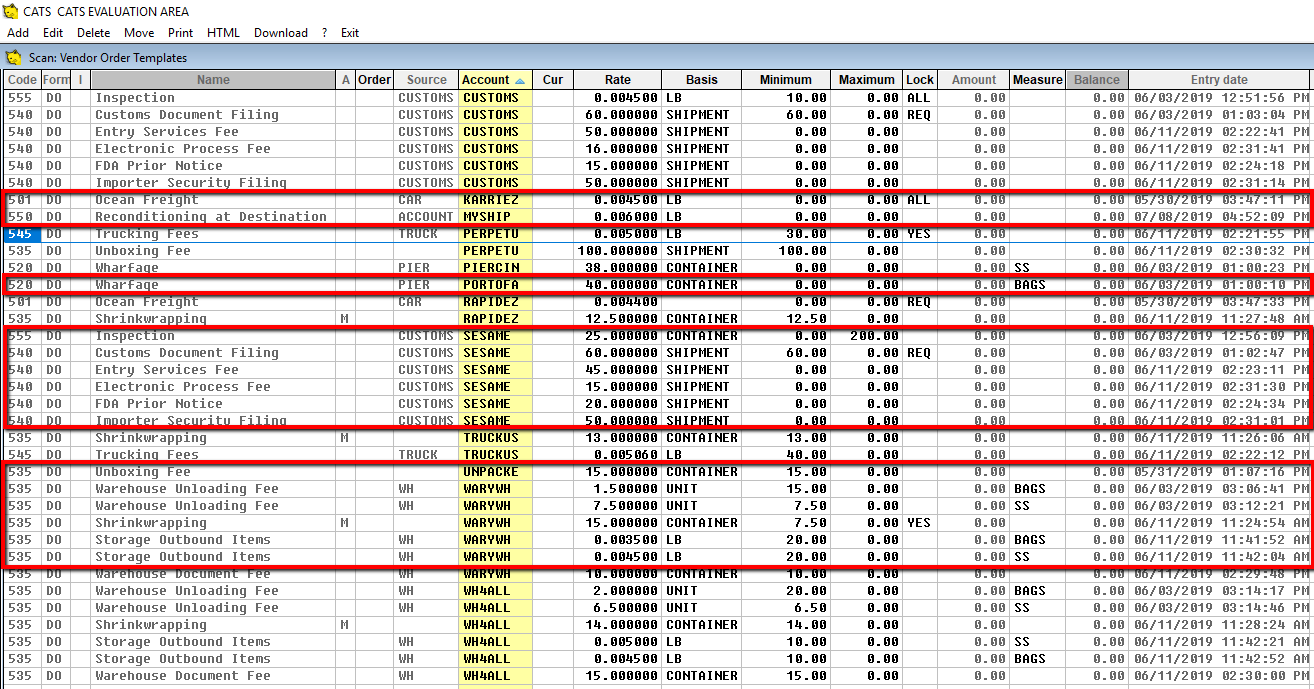
Here are the relevant templates that were applied as vendor order line items for our IDO.
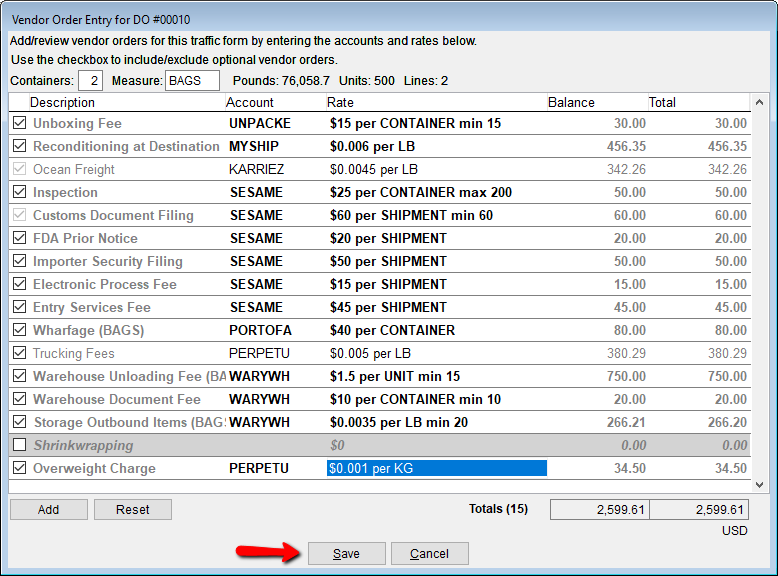
As you can see, CATS pulled in the information it found from the appropriate templates. Roles with no matching template come in with no account and no rate. Templates without codes on them come in with no account and no rate.
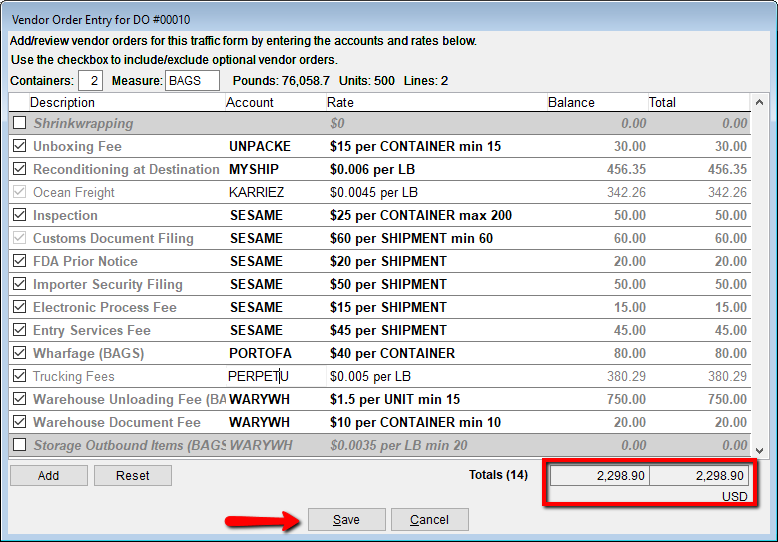
In order to properly create all of the Vendor Order line items, every line item in the list must have an account and a rate. If we fill in the rates and accounts, we can see the total charges that CATS will reserve for this traffic form. In our example, we have un-checked the line item for Other Customs Charges and filled in the other missing account codes and rates.
Pick Save to save your changes and return to the traffic form. Choose Cancel to undo changes and return to the traffic form.
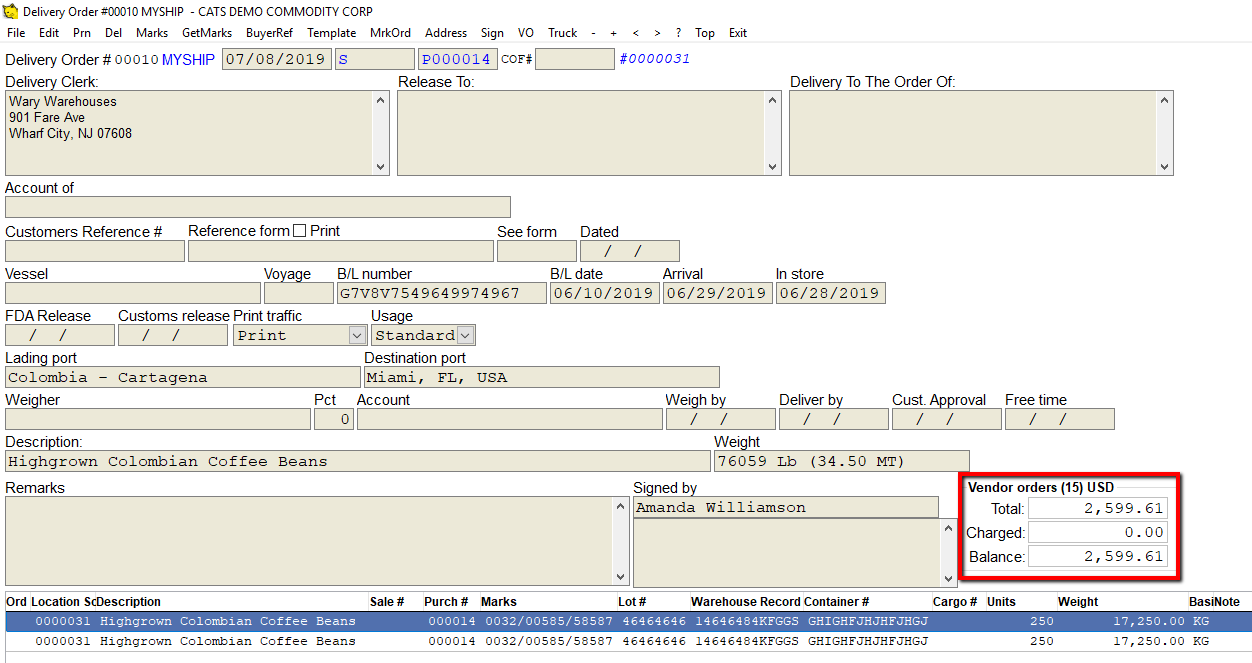
Once you have entered all of the rates and picked Save, CATS will show you the total number of Vendor order line items and their charges.
Adding a Vendor Order Item from the Traffic Form
If you need to add another vendor order item to this form, you can do so by selecting the Add button when in the VO (vendor order item list) screen.
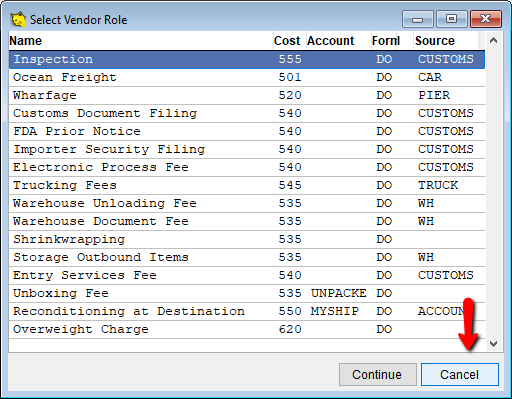
Next, CATS will ask you to select an existing role. You can pick from a role, and enter the information as you would when creating a template.
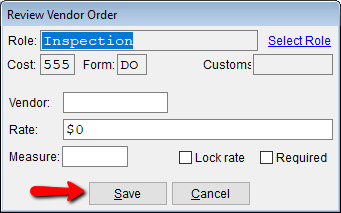
Or, you can pick Cancel to enter a manual role to be applied to this one form.
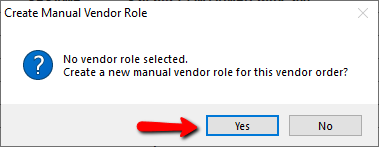
You will be prompted to add a new manual vendor order item. Pick Yes to proceed.
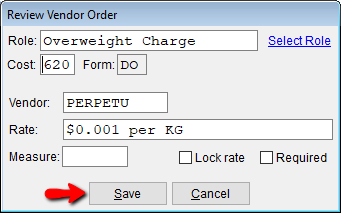
Next, enter the details on this manual vendor order item, and pick Save to proceed.
The new vendor order item will be displayed on the bottom of the list.
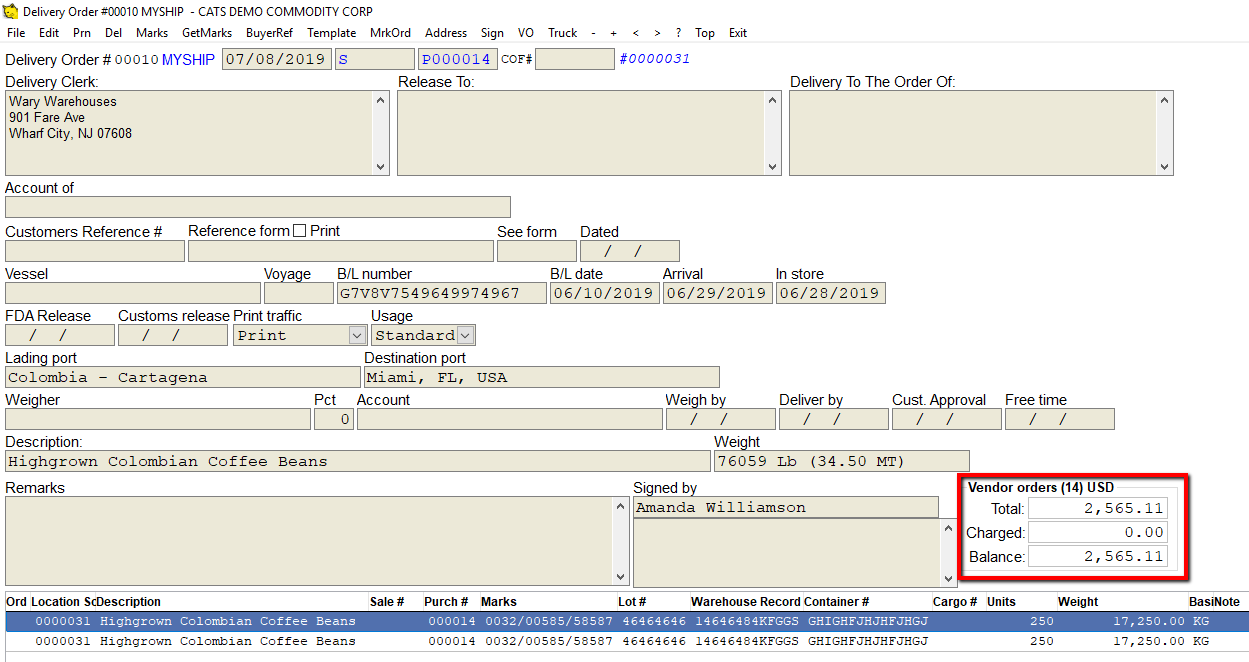
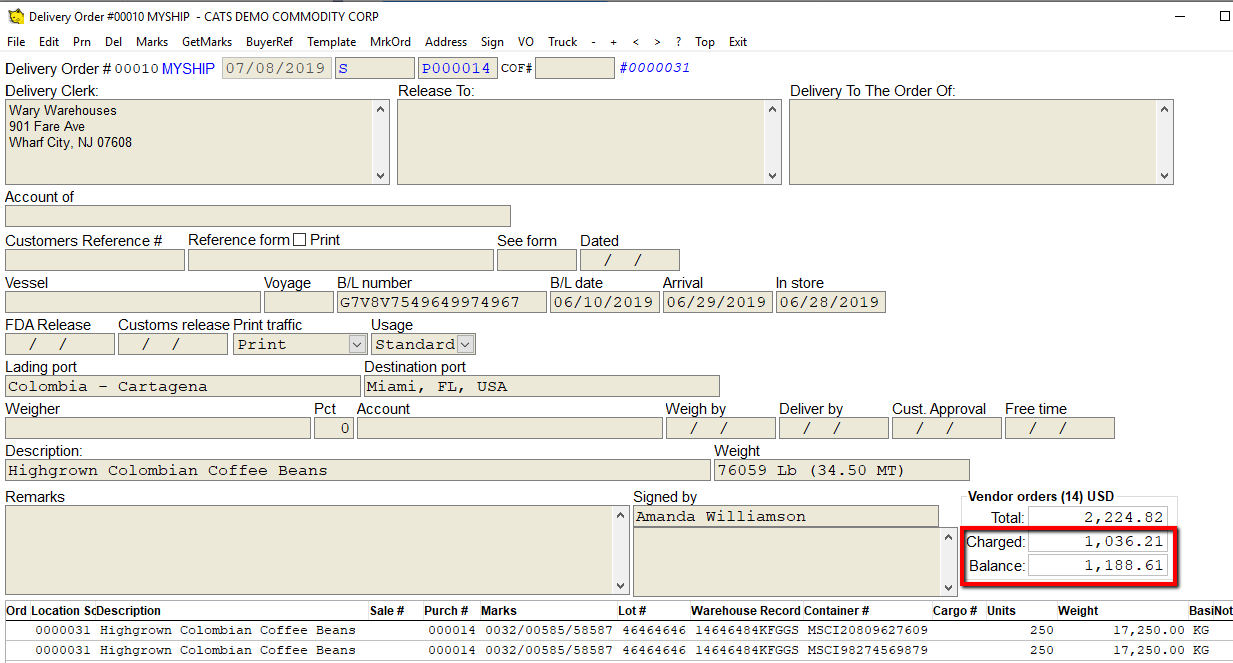
The change in total will be displayed on the order screen in the vendor orders box.
Create a Vendor Order Payable Invoice
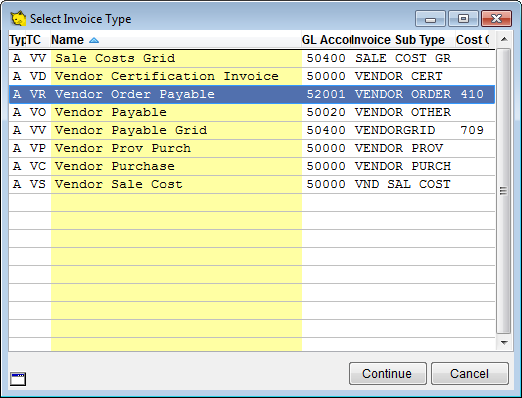
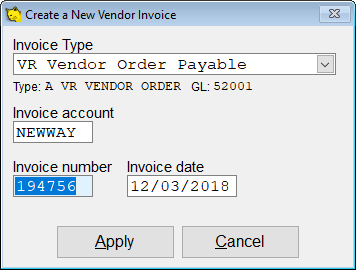
A specific invoice type (VR) is required to use the vendor orders to generate a vendor invoice payable. If one does not already exist, you can set one up. For additional help with creating a new invoice type, see the wiki on Invoice types. Create a new vendor invoice and select the “VR” invoice type.
Enter the invoice number and the date.
On the main invoice screen, instead of “SInv” (Select Inventory) the menu has an option “SOrd” (for Select Order). Click on the “SOrd” menu option to enter a scan that displays all the unpaid Vendor Orders for the counterparty on this invoice.
The scan lists all unpaid vendor orders on a container-by-container basis.
The on-screen search dialog allows filtering the list to find a specific container or traffic detail.
You can filter by
- Traffic form - Enter the type and number.
- Code - Cost code.
- Purchase - Purchase contract number.
- Sale - Sale contract number.
- Container.
- ICO Marks - Use one, two, or three fields of ICO marks to filter the list.
- Warehouse receipt.
- BL# - Bill of Lading number on the traffic screen.
It also displays status information so the user can see the current total amount of the VR they are creating and the total for the currently selected line.
Ways to Select Items
1. As with paying disbursements and receipts, you can specify an alternative amount to pay on a line-by-line basis by entering the amount to put on the invoice directly in the scan.
2. You can choose “Pick” from the menu to pay the currently selected line at its calculated price.
3. You can select “Pick VO” to pay all containers for a particular vendor order item. This means that all containers that fit this vendor order will be selected.
4. Use “Pick Form” to select all vendor order line items from the traffic form displayed in the form number column.
Changing the Vendor Orders
You can also modify the original vendor order definition by selecting Tools > Edit Vendor Order from the toolbar menu.
This takes you to the box on the original traffic form for the order line item you picked. From here, you can modify the vendor order if it has not yet been charged on an invoice and it is for the invoice account.
Finishing the Invoice
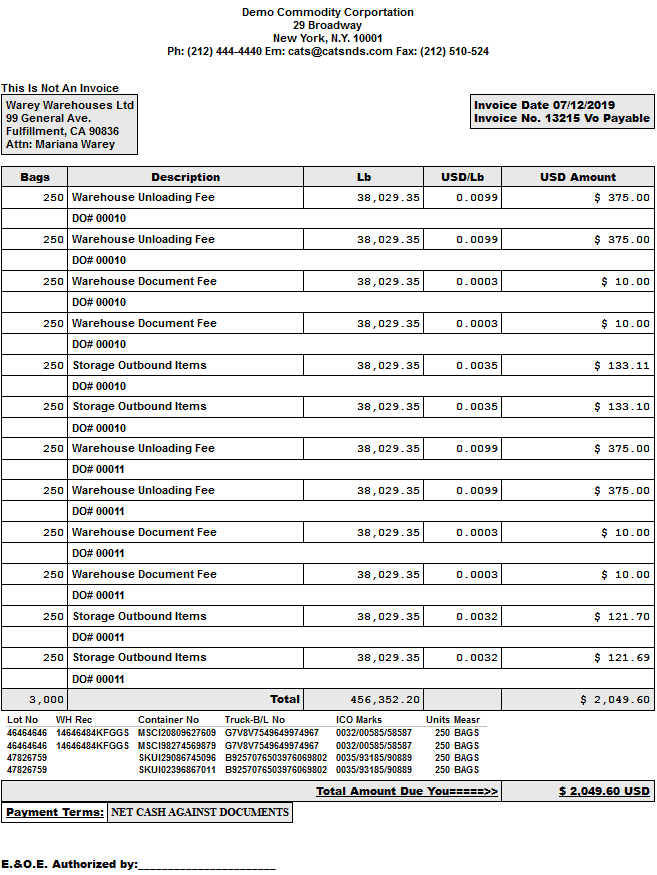
Once the orders have been picked, exit the scan and CATS will populate the invoice to match the vendor order details selected. Print and post the invoice as normal.
If you go back to any of the traffic forms affected by this invoice, the Charged amount will have changed in the VO summary section.
